Tuesday 9 April 2013

Flying Jacob BBQ Roll


Having recently discovered the Bacon Explosion, I thought I would combine that with a "classic" Swedish dish called "Flygande Jacob / Flying Jacob". There might have been some alcohol involved during that thought process...

The Flying Jacob dish was created in the early 70s as a kids meal, but it's really enjoyed by grown-ups as well. Most people do look a bit skeptic when told that it contains rice, bananas, peanuts, chicken and bacon... So the trick is usually to emphasize the bacon part.

http://en.wikipedia.org/wiki/Flying_Jacob

Anyway, having emphasized the bacon part and the beer part (I did mention that part, didn't I?) I figured it would combine very well with the Bacon Explosion concept, plus I got to barbecue the Flying Jacob. :)

First up was a layer of thinly sliced chicken breasts, which I put on some cling film to help with the rolling later on. Add a thin layer of cooked rice on top, sprinkle lots of peanuts and slather in sauce (2 parts cream, 1 part Chili Ketchup) and top it off with two bananas.


Then try to roll it up with out making too much of a mess. The cling film really helps, trust me.


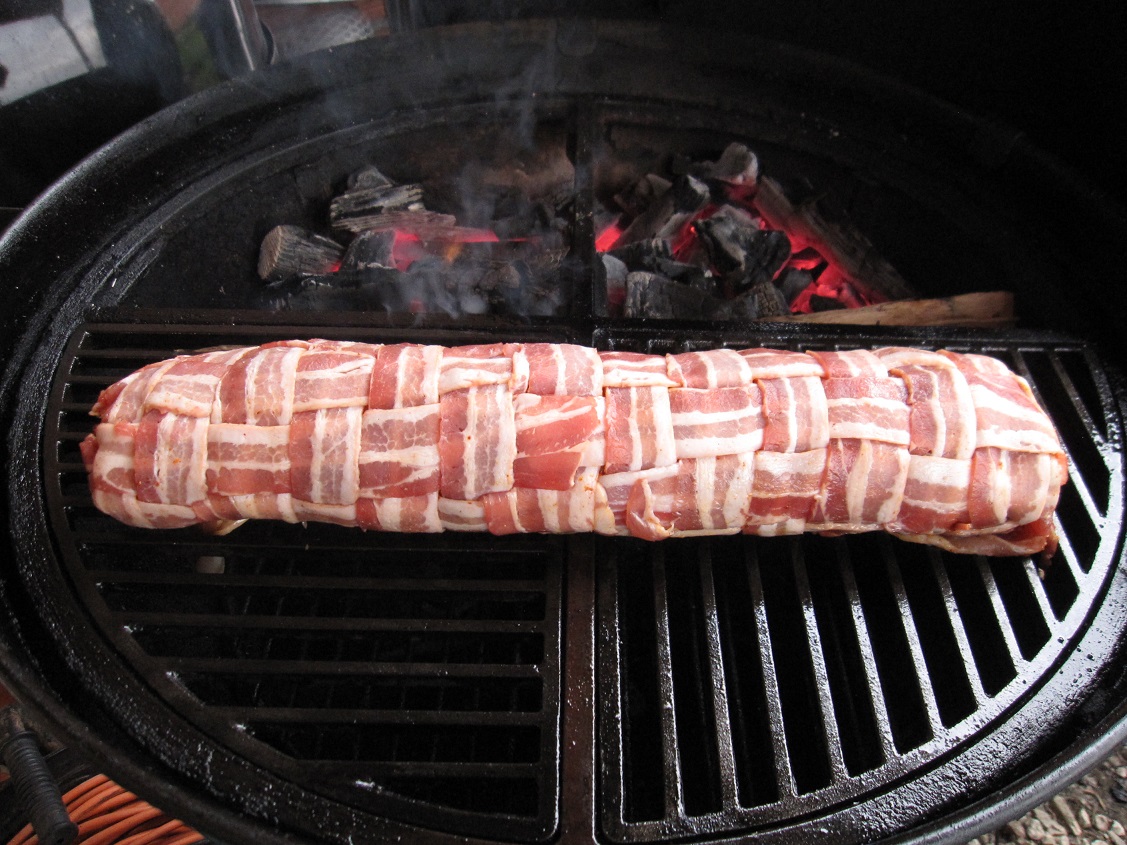
Place all of it on the prepared bacon weave and make a nice even roll. Removing the clingfilm is recommended.


 On and in the barbecue for about and hour, making sure that the chicken has reached a suitable temperature.


Cut it up and serve.


The result? Assuming you enjoy the original dish, this one was even better.

Wednesday 27 March 2013

Bacon Explosion


Perhaps more succinctly put; Bacageddon, according to a friend. In a way I guess that is a type of Turducken, but with less fowl and more bacon. Lots more...

As with anything else, the foundation is the most important layer, so a weave of bacon is made and covered with a nice BBQ rub.

Mmm, bacon...
On top of that, we spread a layer of ready-made French saucisson mince and cover that with some JD & Coke sauce. Add another layer of Chorizo meat (I actually de-sausaged some Chorizo for this) and final cover of more sauce.

Meat, meat and meat.
 Roll it up nicely and into the BBQ.


80 minutes later, having been glazed with some more of the JD & Coke sauce.


Turned out very nice indeed.


Was it any good? Oh yes. :)

Monday 30 January 2012

Chasing Wok Hei

Searching for a specific result is usually a lot harder when you actually don't realize what it is you're looking for. Over the last 15 years I've owned a few woks of different types, cast-iron, non-stick, carbon steel, but I've never achieved that "take-away" smokey taste of a proper stir-fry. For a long time I thought it was simply due to some unknown ingredient in the food that I didn't have, later on I learned that it's the high heat of gas burner that creates the aroma and taste. So when our new house came with a gas stove with a wok burner, I was happy. But after a lot of attempts, I still didn't cook something I hadn't previously done in a flat bottomed wok on an electrical stove...

Glorified noodle boiler.
One day when we picked up some chinese take-away, we asked the owner about this aroma, and he said that it was due to the high heat from the gas burner. "Yeah, yeah, got one of those" I said. "No, you don't," was the answer and he invited us into his kitchen. "Behold!", he said and started the Jet Fighter that he had somehow buried underneath his kitchen. The flames reached up to eye level and were most impressive. "I concur", I said, full of wok burner envy.

Cue a few months later, having some friends around, I mentioned during apéritif my distinct lack of a proper wok burner, "I have a spare that you can have," was the answer. Not, "I have one", but "I have two", and I could have one of them. Happiness happening.

Cast iron happiness.
Unfortunately, still after a few attempts I didn't achieve my goal and I knew that I still was missing something. Doing some more searching on the net brought up the term "wok hay/hei", which can be translated into "breath of the wok", and this is the technical term of the aroma I've been searching for. To achieve this, you not only need the high heat, you also need a well seasoned wok as well, meaning that you have to build up layers of burned oil in the wok, so that the inside of it is smooth as silk and black like a proverb. The initial seasoing is done by simply heating oil in the wok and then let it cool, but to reach Wok Hei, you need to actually cook in the wok, a lot.

Wok in progress
So fingers crossed that I achieve my goal before we get tired of stir-fry.

Sunday 18 September 2011

Making biltong

This was my first foray into curing and drying meats, but it's something that I've wanted to do for a long time. I can't remember the first time that I tasted biltong, but I do know that I've always liked it. During the last year or so I've also had this nagging feeling that, "I can do this", and when I recently received a book from my SA friend Jennie called "Make you own Bilton and Droewors", it was time to step up.

I have to say that the book might have been a little more detailed, assuming that it's geared towards people who would like to make biltong for the first time at home. Thus, it might be a bit excessive in the included salt/spice charts to use 25 kgs and 50 kgs of meat as example weights. Either that or the 0.7 kgs of meat that I used is below consideration. "To make biltong, take one cow..."

The procedure described is first to salt and spice the meat and leave it overnight, and then in the morning, quickly dip it in a water/vinegar mix and then hang it up to dry. Easy enough, until you look on the internet, where everybody else bastes the meat in a vinegar/tabasco/Worcestershire sauce and then salts and spice the meat and leave it overnight before hanging it up to dry. After careful consideration (Tabasco? Hell yeah!) I went for the latter way of doing it.

Select pieces of cow.


I got some faux file from the supermarket, slightly less than 25 kgs, sliced it up and prepared the spice mix.

1 part salt.
1/2 part sugar.
1/2 part crushed coriander seeds.
A small amount of bicarbonate.
A healthy dose of chili powder.


Faux file and faux Tabasco.

I mixed two vinegar solutions, one with Worcestershire sauce and one with Tabasco-ish. I basted the meat with the vinegar solutions and dusted it with the spice mix and left it in the fridge overnight.

Spice em up!

To dry the biltong, people used to hang the meat from the rafters of their houses and let it airdry over time. Most people now uses a biltong box, which in its simplest form is a cardboard box with a lightbulb in it, trusting convection to create the airflow that dries the meat. Living in France, I used a wooden winecrate.


Yummyness in a box.

Hung the meat in the box and let the light do its magic. Normaly should this process take about 3-4 days, so I was rather surprised that it was already done the day after, but probably due to not useing a whole cow, the process took a bit shorter time.


I made this!


So, "I can do this"? Yep. Tasted just like the shop bought variant, although I was a bit surprised that there wasn't any hotness to it, considering the amount of Tabaco and chili powder used, but next time... :)

Monday 12 September 2011

Pulled Pork Experiments

The last time I smoked a pork shoulder, I finished the post with "But I'm not sure that it was 8.5 hours good though..." I've meant to do some more experimenting around that, since I suspected that there's more to it than I did in my initial attempts. So I did some searching and found two recipies that I wanted to try, one more lowkey and the other a bit extra. Perfect.

I mixed a batch of liquid that I injected into the pork and then let it marinate over night.

Needs moar garlic!
Shoulder #1 Marinade:
3/4 dl Apple Juice
1/2 dl Water
1/2 dl Sugar
1/4 dl Salt
2 tbs Worcestershire sauce

Shoulder #2 Marinade:
2 dl Coca Cola
1 dl Jack Daniels
1 dl Worcestershire sauce
1 tbs Cider Vinegar
6 chopped garlic cloves
1 tbs Tabasco
1 tbs Celeri Salt


The perfect tool for experiments.
I took them out of the marinate in the morning and dried them off and rubbed them with spices.

Shoulder #1 Spice Rub:
3/4 dl Sugar
1/2 dl Paprika Powder
1/3 dl Garlic Powder
1/3 dl Salt
1 tbs Chili Powder
1 tbs Cumin
1 tbs Black Pepper powder.

Shoulder #2 Spice Rub:
Galena Street rub from Penzeys (Thanks Magnus for shopping).

Then onto the smoker and once again injected with the marinades. The last time it took 8.5 hours to reach my target of an internal temperature of 95°C and this time it went a bit quicker. One shoulder was done after 7 hours and the other after 7.5 hours. Wrapped them in tinfoil and let them rest for an hour to let the juices redistribute themselves in the meat. Grab two forks, and if you've done it right, the pulling of the pork will go very easy.


Toothpick for identification.

The last time I figured that I missed a suitable sauce to use with the pulled pork, so the following was used:

2 dl Ketchup
1.5 dl Coca Cola
1 dl Jack Daniels
1/4 dl Tabasco
2 tbs Honey
1 tbs Soy sauce
Salt + Pepper

I have to admit that I was a tad bit sceptic when mixing it, but the result was amazing. A two punch taste, the initial with flavour and a second hit from the Tabasco. Great stuff, will be used a lot in the future.
   
Very, very tasty.

Serve it all in a bun and slather it with the sauce. Stuff of legends. The JD & Coke shoulder tasted amazing while the more normal one had a better smoke flavour, but still tasted great.

Well worth the time in the smoker. :)

Wednesday 27 July 2011

Deboned chicken with mozzarella and tomato.

I saw an interesting video on youtube recently (video), some french guy showed how to debone a chicken and that looked really nice. So I though I would give it a go. In the video he says it should take about a minute to debone a chicken, and I think I did rather good, it took me around two beers, which is rather quick for a newbie.
What do you call a spineless and gutless chicken? A chicken chicken?
Having removed all the non-meat parts, I added a mix of tomato, mozzarella, basil and chili, and trussed it up. In French they call this a "saucisse poulet", i.e. a chicken sausage, which is rather fitting.

I've been to TG...
In the barbecue and half an hour later it was ready. Even the "BBQ cat" showed up rather quickly which I take as a good sign, and yes, it was very good.

Chickenloaf?
 Might have to use a stronger filling and maybe let it marinade from the inside for a bit longer, but we're onto something here...

Monday 18 July 2011

Smoking a pork shoulder

Yesterday was my second attempt at smoking a pork shoulder in order to make pulled pork. My first attempt was about a month ago and that took a bit longer than expected, meaning that after 10 hours in the BBQ the meat was still not done, but I was, since it was 2 AM and bed called. This time around I planned it better, so the meat went in the BBQ at noon.

Using the Minion method for the coal fire.

The shoulder was rubbed in a simple mixture of salt, pepper, sugar, dried bell pepper and chili pepper. Normally I slather the meat in mustard first, which helps the rub to stick better, but since this actually doesn't add any flavour to the final product and only makes it all a lot messier, I skipped that this time around. Wrap it all in cling film and leave it in the fridge for a few hours.

When smoking a pork shoulder, the time it takes can be deceiving. My two attempts have used a shoulder weighing in at 1.5 kgs, so it's quite a small packet but it will still need lots of hours in the barbecue to reach the wanted temperature. The reason for this is called the temperature plateau, which is when the internal temperature of the shoulder simply stops rising, and might even drop a few degrees, and is thought to be due to a conversion process where tough collagen turns into soft gelatin, which can take a couple of hours.

Everybody plots graphs while barbecuing, right?!

Due to that, I cooked at a higher temperature this time (150°C) compared to last time (125°C) in order to speed up the cooking time a bit.That might of course have an impact on the end result, but I rather do that and have a baseline to compare to in the future.

8.5 hours later.

This time around it took 8.5 hours to reach the wanted internal temperature of 94°C, so the shoulder was wrapped in tinfoil in order to let it rest for an hour so that the moisture in the meat could redistribute through out the meat.

A nice red hue due to the smoke.

Use two forks and work those forearm muscles by pulling the pork to shreds. If cooking a larger or multiple shoulders, there are actually attachements to your power drill to do this process, since it can be rather strenuous work.

Ready for consumption.

So was it any good then? It was indeed and had a nice smokey flavour, but I would like it to be a tad bit more moist next time, so I might have another go at a lower temperature. But I'm not sure that it was 8.5 hours good though...